
Duration: 2 hours
This lesson will cover the topic of composting, which involves processing organic waste with the help of aerobic organisms. Composting helps us convert biowaste created in households, agriculture, or industrial production into a valuable and inexpensive resource that can be used to grow plants on balconies, in gardens, and on larger areas.
In nature, all dead organisms are decomposed by various natural processes, and their bodies become part of a new cycle of life. Nature is thrifty and reasonable. It does not throw anything away or build huge landfills of dead plants or animals. Instead, it recycles. Complex buildings of dead organisms are broken down into basic building blocks, and new ones are built according to complex plans. An atom of carbon or phosphorus that is embedded in the stem of a dried sunflower may, in two years, be part of the fruit of a cucumber, a tree, a cat, or even you.
Imagine a compost pile as a fast-forward button for the natural decomposition processes that happen on the ground. When leaves, fruits, grass, and branches fall to the ground, various organisms like bacteria, fungi, insects, earthworms, snails, and centipedes kickstart the decomposition process, turning the dead material into humus which enriches the soil and makes it easier for new plants to grow.
The compost pile acts as a catalyst for these natural processes and cultivates beneficial microorganisms that we want to increase and introduce into the soil. Composting is essentially the controlled breakdown of organic material with the help of aerobic organisms.
Composting is a simple and effective way to transform our biodegradable waste from a problem into a solution, creating a useful product – compost.
Every household produces a certain amount of biodegradable waste daily. Kitchen waste and other biodegradable household waste make up more than half of the total waste generated by the average household. When we consider the “waste” from our yards or gardens (like garden plant remains, stems, leaves, inedible fruits, tree pruning residues, weeds, and ornamental plants), the proportion of biodegradable waste in the total waste mass increases even further. This waste needs proper disposal, whether we manage it ourselves or through the utility company.
In places where the separation of bio-degradable waste (and other types of waste) is not organized, all waste is mixed together, covered with new waste and soil. The biodegradable part of mixed municipal waste decomposes without oxygen, with the help of anaerobic microorganisms. This process generates methane, a potent greenhouse gas. Additionally, unsorted waste landfills pose a significant threat to groundwater, and the leakage of harmful substances from such landfills can lead to potential environmental disasters.
The direct benefits we achieve from composting are:
Material suitable for composting is categorized as follows:
These ingredients are unsuitable for composting as they are either inorganic or contain chemicals that could degrade the compost and contaminate the soil.
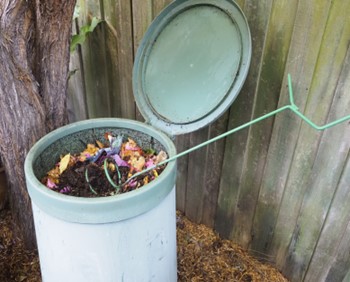
We can start composting already in the apartment, where most of our bio waste is generated.
One bucket with a volume of 40 to 60 liters is sufficient. The procedure is simple. We drill a hole around the rim of the bin so that the compost has enough air, cover the bottom with broken or cut twigs, so that air can reach the bottom of the container. Some cardboard or dry leaves, and some soil, or ready-made compost go on them. Soil or compost serve as an inoculator , they contain microorganisms that will inhabit our kitchen and other waste and turn it into compost over time. Kitchen waste is rich in nitrogen, so it should be mixed with some carbon-rich material. Cardboard, sawdust, wood chips or dry leaves will serve the purpose. When we put our waste in this small home composter, we simply cover it with sawdust and moisten it as needed. The ratio should be about three parts brown, carbon-rich material for every part green, carbon-rich material. So, for every handful of leftovers from the kitchen, three to four handfuls of sawdust (or whatever you already have). The contents of the bucket should be stirred every couple of days, so that air reaches all parts of the container. You can keep the container in the apartment or on the balcony, it is important that it is not in direct sunlight and that it is not exposed to freezing in winter. In addition to the correct ratio of nitrogen, carbon and air access to the container, adequate humidity is also very important. If the compost is too dry, it needs to be moistened, if it is too wet, add a little more sawdust and mix everything. We can do the composting process from start to finish in a home composter like this and use the finished compost in the garden, flower pots, or give it as a gift to someone who has a garden.
If you have your own garden and garden composter, you can use a home composter as a convenient storage for kitchen waste mixed with an appropriate amount of carbon-rich material. Fill the container with this mixture until it is full. When the container is full or when convenient, empty the contents into the garden composter.
If you only intend to use the home composter as temporary storage for biowaste generated in the household, and you plan to compost the contents in the garden composter instead, simply stack the brown and green materials in layers without adding water. Sawdust or another dry carbon-rich material can be used to absorb water from kitchen scraps and prevent the formation of harmful gases and unpleasant odors.
Composting in urban areas poses unique challenges. The limited space and many residents living in apartments without private yards make it difficult to compost. If your building has a common area, garden, or yard, you can place a garden composter there with the agreement of all tenants. However, a classic garden composter may not be the best solution for several users. It’s hard to ensure everyone adds enough carbon material and maintains the right moisture level. Composting still requires supervision and occasional intervention to control temperature, humidity, and turning over the pile. Not everyone may be willing to take on this additional responsibility, and a neglected compost pile can lead to unpleasant odors.
An elegant solution for communal composting is a rotating composter variant.
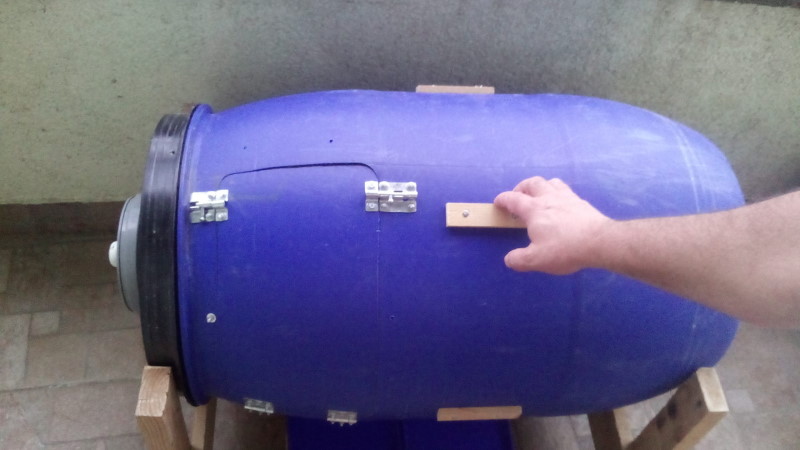
Using this composter is easy. You just need to add your biowaste and the required amount of brown, carbonaceous material, then spin the composter. Rotating the composter helps mix and aerate the compost, and the composting process happens pretty quickly. Depending on the design, these composters can either be emptied manually or be flow-through, allowing the finished compost to fall out on its own through the provided openings.
Composting with earthworms is easy. These earthworms don’t require much care. They can be kept in a bucket under the sink or in an area of several hundred square meters. Compost worms, most often Eisenia fetida but sometimes other species, require minimal resources. They need a place to live (a bucket, plastic or wooden container with a lid), food, moisture, and air. They efficiently turn biowaste into vermicompost. If their living conditions are good, they will not leave their habitat. They self-regulate their population. When they feel they have multiplied enough and filled their habitat, they stop reproducing. The main product of compost earthworms is their excrement, vermicompost (worm castings). Earthworms’ excrement is rich in nutrients that plants can readily absorb.
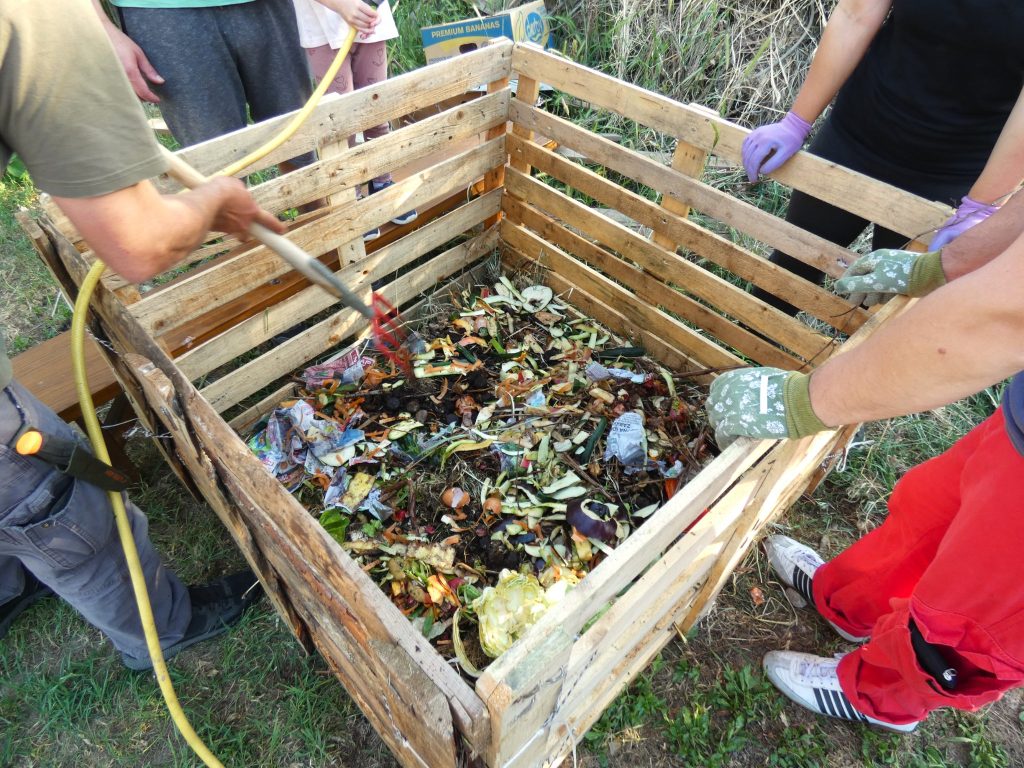
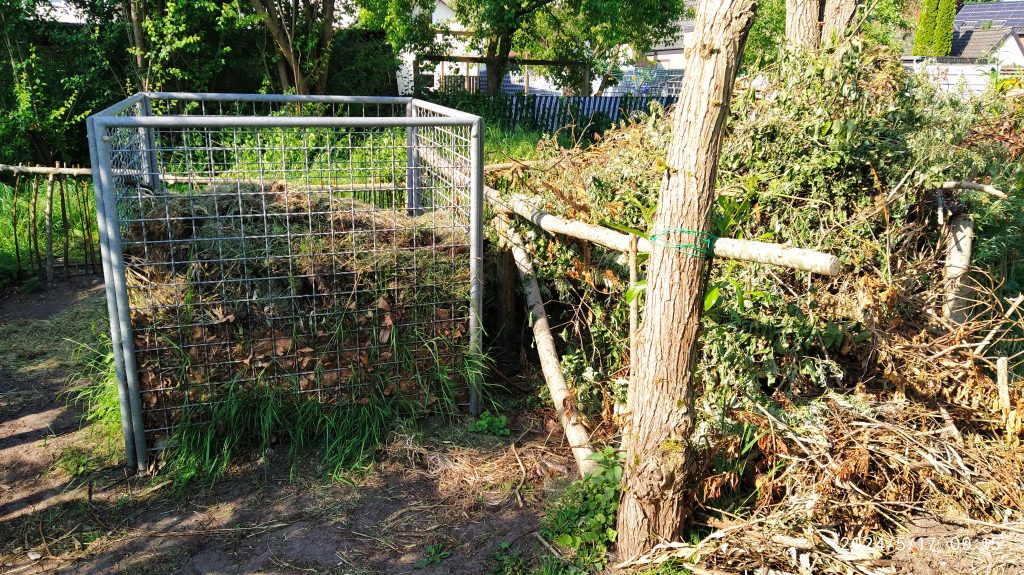
Composting in the garden is a common method of composting. We can compost in composters or in a pile without them. It’s beneficial for the garden compost pile to have a volume of one cubic meter, whether in a composter or not. This volume ensures that the compost pile has enough air, even in the middle, and that the composting conditions are aerobic throughout all stages.
We can create a garden composter from materials like old boards, pallets, panels, brick, stone, or wire mesh. The shape of the composter is usually a cube or a roller (if using wire mesh).
The mature, finished compost from our composter can be used in the garden to enhance soil quality. To maximize the benefits for our garden and crops grown from the compost, we must pay attention to the following:
The main sources of material for our compost are biowaste generated in our household or farm. If our compost needs exceed what we produce, we can collect or purchase biowaste from others to meet our requirements. Whether the material is acquired for free or bought, it’s important to avoid introducing unwanted materials into the compost. Agricultural crops are often treated with pesticides, and these chemicals can be present in the crop residues. While a thermal compost pile can break down most pesticide residues, not all will decompose. If these residues make their way into our garden, they can harm the soil’s micro- and macrobiology. Additionally, consuming vegetables and fruits grown in such soil may result in us ingesting these harmful chemicals or their residues.
Regardless of the type of composter, we always aim for our compost piles to have a volume of one cubic meter. This volume ensures there is enough oxygen and compost in the center of the compost heap. Oxygen is necessary for aerobic microorganisms to thrive and facilitate proper composting.
All organic matter is composed of carbon (C) combined with smaller amounts of nitrogen (N). The balance of these two elements is referred to as the C:N ratio. Materials with a high nitrogen content are called nitrogenous or green materials such as animal excrement, urine, grass clippings, vegetable and fruit residues, and coffee grounds. Materials with a high carbon content are called brown materials such as sawdust, wood chips, straw, and cardboard. Aerobic microorganisms in the compost pile are most active at a ratio of 1N:3C. This means that for every unit of green, nitrogenous material, it is necessary to add three units of brown, carbonaceous material.
We layer the materials as shown in the diagram below until the composter is full or reaches the desired volume. It’s recommended to pour water on the material between each layer, making sure not to overdo it. The material should be moist but not soaked.
With adequate moisture (approx. 60%) and enough air (oxygen), our compost pile will quickly start to heat up.
Take some compost in your hand and squeeze it in your fist.
Result number 1:
The compost is moist and cold to the touch, and has an unpleasant smell. When we squeeze it in our fist, liquid drips from it. Compost that is too wet allows anaerobic bacteria, which are undesirable for compost, to dominate.
How to “repair” compost that is too wet:
Shake and aerate the compost pile by adding more carbon material. Dry carbon material will absorb excess moisture. A pile that is dried and ventilated like this will quickly start working. Aerobic microorganisms will once again get ideal conditions for living and will eliminate undesirable microorganisms.
Result number 2:
The compost is dry to the touch or just slightly moist. When we squeeze it in our fist, the material dissipates. The material that we put in the compost pile decomposes slowly or not at all. The compost pile is not heated. The compost is too dry, the ingredients of the compost heap are not decomposed, and the microbiological activity is minimal.
How to “repair” too dry compost:
Shake or rearrange the compost heap evenly moistening the material.”
Result number 3:
Compost should feel moist to the touch. If you squeeze it in your fist and it forms into a lump from which it is not possible to squeeze out water, that’s a good sign. The formed lump of compost should be easily dispersed with little pressure. The material in the compost heap should show clear signs of decomposition, without any unpleasant smells.
The ideal moisture level for compost is neither too dry nor too wet, so no intervention is required.
Microorganisms that break down the compost material under favorable conditions reproduce rapidly, consuming the compost material and each other. The increased temperature of the compost pile is a result of these active microscopic processes. The rising temperature of the compost heap indicates that we have determined the correct C:N ratio and ensured sufficient water and air.
Thermal composting is good for several reasons. Temperature destroys
Monitor the temperature of the compost pile using a thermometer. The temperature should not go above 65 degrees Celsius. When it reaches this temperature, the compost should be turned over, aerated, and possibly dampened. Temperatures exceeding 65 degrees can also kill off beneficial microorganisms that we want to thrive and add to the soil in large numbers.
After two or more rearrangements of the compost pile (depending on the material and the pulverization of the starting material), it is observed that the compost pile no longer reaches such high temperatures. The starting material has decomposed and is no longer recognizable. Microbiological activity is still present in the compost, but it is no longer as active. The resulting material is dark brown in color and has a pleasant, earthy smell. This compost can be used in the garden, in compost preparations, as mulch, and so on.
If intending to use the compost for seedlings or as an addition to potted plant substrate, the compost should undergo a ripening or aging phase to reduce the microbiological activity to a level where it will no longer harm your plants. This involves further rearranging the compost, moistening if necessary, and leaving it in a suitable place for three to six months.
To determine if the compost is ready, we can perform a simple “salad test.” Plant a few lettuce seeds in the compost container. In well-matured compost, the lettuce seeds will germinate within two to five days. The resulting plants should be dark green and healthy. If the lettuce does not sprout within this timeframe, or if the sprouted plants appear stressed, irregular, stunted, or light green, it’s best to let the compost continue to mature for a bit longer.
The aim of this lesson is for students to understand the value of biowaste, identify potential resources in their environment (school, household, property, village, or city), and discover how to solve a problem by using the provided tools.
Create a composter with a volume of 1 cubic meter using the available materials. The composter should be sturdy enough to maintain its shape during composting and should be designed for easy disassembly, access to the compost, and handling (such as overturning and emptying the composter).
A board composter
Composters made from pallets or recycled boards are very popular among gardeners and other composting practitioners. The material is easy to obtain, and you don’t need to be particularly skilled to make it. You can assemble an efficient composter from pallets without any intervention with tools. Simply arrange the pallets on their sides to form a cube in the ground plan, connect them with twine, wire, nails or screws, and the composter is ready for filling. The most commonly used pallet dimensions are 120cm x 80cm. The composter assembled in this way has dimensions of 120cm x 120cm and is 80cm high. Its volume is slightly larger than 1m³ (more precisely 1.152m³ or 1152L), but still, the middle of the compost pile can be sufficiently aerated.
Making a composter out of a pallet or some other board requires a little skill with tools. Even if we are not very skilled carpenters, making a composter is a great beginner’s project. If the pallets are the source of the board for the future composter, we must first disassemble them. The tools we will need to disassemble the pallets are a hammer, crowbar, pliers, etc. Try to work on a clean and flat surface and be extremely careful. A rusty nail sticking out of the board can cause injury.
Define the dimensions of the future composter, measure and saw the boards to the desired length, and assemble the four same sides as in the sketch below.

Make sure to use two screws to fasten each board in order to create strong and stable sides. You can stack the horizontal boards on the sides of the composter, leaving a small space between them. This allows for better aeration and ensures smooth composting processes. If you stack the boards densely and find that the compost lacks oxygen after the first composting cycle, you can use a drill to create additional air holes. Ideally, the composter should have a volume of 1m3, but feel free to adjust its dimensions to suit your available space and materials. Lastly, you can connect the pages using twine, wire, or simple clips.
Characteristics of a wooden composter
To prevent the compost from drying out, consider lining the inner sides of the composter with cardboard. This will also serve as a barrier between the composting microorganisms and the wooden sides, extending the composter’s lifespan by several years. Avoid painting the composter as the colors may wash or peel off into the compost and surrounding soil. Instead, consider protecting the wood by burning it, which can significantly increase the composter’s durability.
A wooden composter can be an attractive addition to your garden. If you’re skilled and have time, you can create a unique composter with a pentagon or another polygonal base. Decorate the sides with woodcuts, combine woodcuts with burning the surface, or add ventilation holes according to a particular pattern or design. Your imagination, determination, and effort are the only limits, and you’ll gain experience and skill through the process.
